A Fire Made From Scratch

 The “Candlelight Campfire” at Falling Creek Camp.
A fire can serve as one of your greatest tools on a camp out; or become the source of your greatest aggravation. Building one may sound simple when you brought a book of matches or a Zippo light. But keeping the right things in mind can save you from fighting all night to spark life into a smoldering, pit of ash.
First, and perhaps most obvious, start collecting wood for your fire in the day time. Starting at night leaves you scrambling in the dark. Even with a high-powered flashlight this can be daunting since your scope of vision is limited to a single beam of light. Getting everyone in your group involved, collecting wood for 10 minutes when you’ve established camp, makes this an easy task.
 Campfires have remained one of Falling Creek’s most memorable and treasured traditions among both campers and staff. This is “Friendship Campfire” during the Main Camp Session.
Some people believe that the type of wood you use determines the type of fire that burns, saying hardwoods (deciduous trees like maples and oaks) burn brighter and longer than softwoods (pines and evergreens). While this has some bearing on your fire’s longevity since hardwoods by definition are denser, it doesn’t have as much to do with your fire’s success as the dampness of the wood you use (or dryness).
According to the UK’s Forestry Commission, a green log of average moisture content has about half the efficiency of dry wood of the same species. Ideally the wood should make an audible ‘snap’ when you break it. If it’s a log-sized stoke, it should have radial cracks or peelable bark. Wood that has fallen freshly off the tree will take you longer to break and might splinter or bend. If you can’t break it up into your wood pile, it’s not worth the effort. Throw it back into the woods. If you’re collecting after a heavy rain, do your best to find wood in dry patch of the forest.
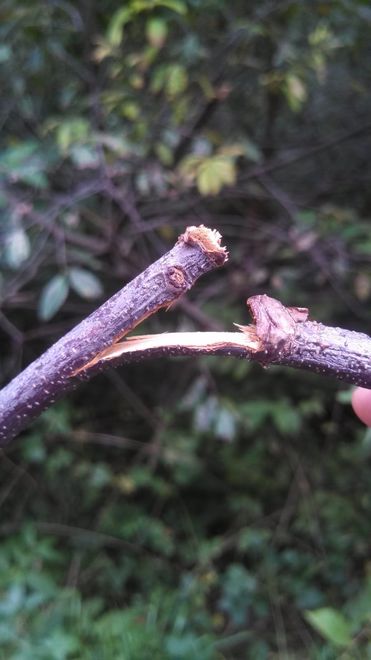
Another concern using green wood— or wet-wood in general— is the health risks. The fumes released can cause anything from a bad coughing fits to illness. It also has the potential to coat your food in airborne toxic particles.
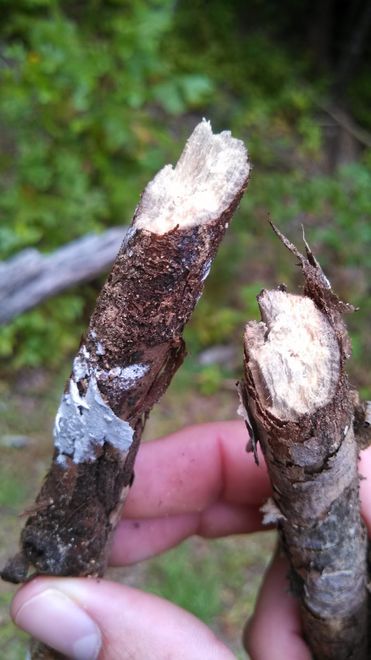
Well-seasoned, dry logs on the other hand leave minimal smoke and have increased net-heat for anything you place over it with decreased CO2 production (especially compared to electrical devices or propane tanks). It is well worth your time to find dry wood.
If you live in North Carolina, or any of the surrounding states, try finding Hemlock twigs (pictured below). If you can find some dried hemlock, it will provide perfect kindling. It has a subtle waxy coating, that makes it slightly more flammable than other branches. Another tree to look for is the Yellow Poplar. Its bark peels off the wood like a banana, making easy wood shavings.
 Dry Hemlock
Never use leaves. They don’t burn bright enough to catch wood. And if they do get enough of a flame, it comes at the price of smoke storm.
If you happen to have scrap-paper or a knife to whittle wood shavings on you, this will work just as well if not better. If you can get a flame going using flint and steel, you will need a birds nest made of soft fabric and more patience than I have. Of course kindling only lasts for a couple minutes at most, which is why you need more of a structure down for the fire to grow.
 Hemlock has short soft needles on droopy branches
Coming from a Boy Scout background and having gone on more overnights than there are days in a year, I have seen fires built in all manner of sizes and shapes, from perfectly geometric structures that look more like Mayan temples, to a pile of big twigs thrown over a pile of smaller twigs. I can say with surety, they both work great (but I tend to get carried away with the former). It comes down to the basic necessities of fire (i.e. oxygen and fuel).
Having said that, you can’t discount good form. You can waste time throwing together a pile of wood and hoping for it to catch. But having structure, even at the most basic level, will make your life and your campout much easier. I’m not saying you need to build the Taj Mahal of campfires. But knowing the needs of a fire in its early stages allows you to make the right creative choices in the future, when you’re defending your scattered pile of branches that no one thinks will light.
 Yellow Poplar leaves have a unique 4-point shape
For starters, fire needs air. It doesn’t need a lot. Just like a candle, blowing too much on a lone flame can extinguish it. But it needs some. So when you build whatever structure you’re making, it’s important to account for oxygen flow.
Also, fire burns upward. So blowing directly above an ember in its early stages leaves nowhere for it to go. The airflow works best coming from the sides up. By this logic, the fire naturally spreads upward to whatever sticks or kindling you’ve stacked above your original flame, kind of like reverse gravity. So don’t perch your kindling on top of a pile of wood expecting a blaze to burn downward.

If you dig out a little hole, perhaps with a stick making an ‘x’ pattern across the ground, or just build up your base tall enough that you can ensure it will have plenty of horizontal airflow, you can solve this problem.
A better way, if you have more time, is to build up a breezy log-cabin. It’s just as simple as it sounds, stacking parallel sticks over each other to look like an early pioneer’s house. This allows for air-flow, but not so much that a gust would squelch out whatever progress you’ve made. Start with sticks the width of your thumb and build your way up to sticks the width of your pinky.
It might help to make a level surface before you begin. If you can’t find a level surface, you can dig loose soil out from around your fire pit and pack it down flat.
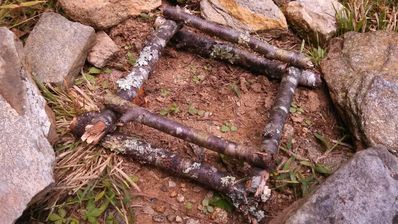
If you want to get fancy with it, you can even lay twigs across every few layers of your cabin to make a platform , providing additional fuel once your fire gets going.
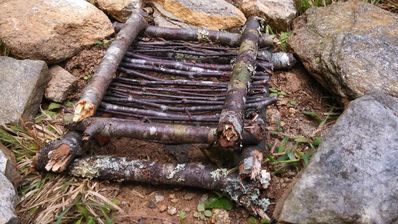
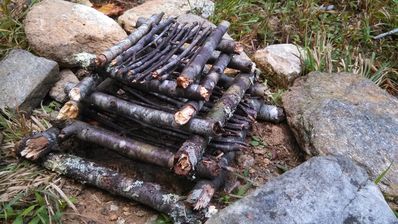
 You can use these platforms to stuff your kindling (preferably one of the lower levels).
If you want to take it a step further and surround it with a teepee (an arrangement of long-skinny sticks propped along the outside) be sure to snap the tips off your log cabin’s edges, so you don’t have any jangled corners.
 These jagged edges are easy to fix as long as you use dry wood.
The sticks on the teepee should be as long, skinny, and straight as you can find them. Remember that fire burns upward. So it will be one of the first lines of fuel once it catches.

While a teepee may seem like overkill, it allows blockage from unexpected breezes, as well as keeps your fire burning high and bright. It should be noted that in order to light your fire, you need to keep one side of the teepee open. Ideally, your teepee’s skirting should be dense enough to conceal your log-cabin (unlike the picture above).
 Results may vary
A tactic for keeping your kindling in place after you’ve built a teepee around your cabin is building an inverted teepee , which is exactly what it sound like. You (delicately) place small twigs on the inside of your log cabin’s top floor so as to make an upside-down teepee— or ice cream cone— shape.
Then, gently place your kindling inside the confines of this pocket between your inverted and outward teepee. You can use a match to light your shavings, or a candle if you need a longer lasting flame.
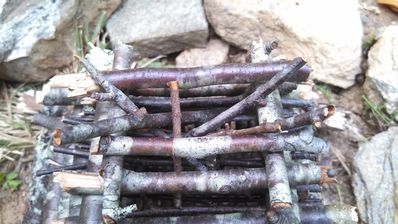
If you can keep your outer teepee intact while your fire picks up, you shouldn’t have any trouble maintaining the brightness or consistency of the heat. Just keep adding long skinny branches vertically to the outside. If your fire falls apart anyway, or dies-out, you can bring it back by tossing on a fresh bundle and blowing on the coals horizontally, in long, steady breaths. At this point, don’t worry about too much air. It’s almost impossible to blow coals out than, rather than your initial flame.
That’s the basics from my experience. If you can think of any other tricks you may have learned or discovered over the years, feel free adding it in the comment section.